Hey there, piercing enthusiasts! So, you’ve taken the plunge and got a fabulous new ear piercing. Congrats! Now comes the important part – taking care of your new addition to ensure it heals beautifully.
Proper aftercare is crucial when it comes to maintaining healthy piercings and preventing any unwanted complications. That’s why we’ve put together this ultimate guide on how to clean your ear piercing like a pro!
Whether you’re a newbie or have had multiple piercings, this blog post will provide all the essential information to keep your ears looking gorgeous and infection-free. So, let’s dive in and learn everything about cleaning that shiny new stud or hoop!
How to Clean Ear Piercing?
Ear piercing aftercare is crucial for ensuring a successful healing process and maintaining healthy piercings. But what exactly is ear piercing aftercare, and when does it start?
After getting your ears pierced, it’s important to follow specific care instructions provided by your piercer or studio. This typically involves regularly cleaning the piercing with a saline or specialized cleaning solution. The aftercare routine should be followed consistently until the piercing has fully healed.
Proper care of your new ear piercing can help prevent infections, reduce swelling, and promote faster healing. Always keep the area clean and avoid touching it with dirty hands or unnecessary objects. By following these simple steps, you’ll be on your way to enjoying beautiful earrings in no time!
How Long Do Ear Piercings Take to Heal?
- Typically, it takes about 6-8 weeks for the initial healing process of an ear piercing. However, full recover may take up to more than a year.
- Following proper aftercare instructions and keeping your piercing clean is crucial during healing. This means avoiding touching or twisting the jewellery too much and cleaning it regularly with a saline solution or mild soap.
- With proper care and patience, you’ll soon be able to enjoy all those beautiful earrings without discomfort or complications! Remember that if you notice any signs of infection during this healing period (which we’ll discuss later), seek medical attention promptly.
Cleaning Your Ear Piercing
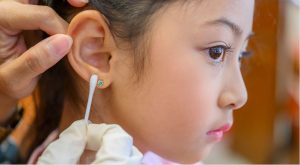
Properly cleaning your new ear piercing ensures a healthy healing process. So, what’s the best way to keep it clean and infection-free? Start by washing your hands with water and soap. Then, use a saline solution or mild antimicrobial soap to cleanse the piercing twice daily.
Avoid using harsh chemicals or alcohol-based products that irritate the skin when cleaning. Instead, opt for a gentle approach by soaking a cotton ball or swab in the solution and carefully wiping around the pierced area. Remember not to twist or turn the earring during this process as it could cause further irritation.
Maintaining cleanliness is key when caring for your new ear piercing. By diligently following these simple cleaning steps, you’ll help promote proper healing and reduce the risk of infection along the way!
Best Ways to Clean a New Ear Piercing
One of the most important steps in caring for your new ear piercing is keeping it clean. Proper cleaning can help prevent infections and promote faster healing. Here are some best practices for cleaning a new ear piercing.
First, always wash your hands thoroughly before touching your piercing. Then, use a saline solution or a mild saltwater mixture to cleanse the area. Gently soak a cotton ball or pad in the solution and gently dab it around the piercing, removing any crust or debris. Avoid using harsh products like alcohol or hydrogen peroxide as they can irritate the skin. Clean your piercing twice daily to keep it free from bacteria and promote healing!
How to Clean an Infected Ear Piercing?
Before touching the piercing, wash your hands with soap and water.
- Then, create a saline solution using non-iodized sea salt and warm water
- Soak a clean cotton ball or pad in the solution and gently dab it onto the infected area
- Avoid using alcohol or hydrogen peroxide as they can further irritate the piercing
- Clean your earring posts, removing any debris or crust that may have accumulated.
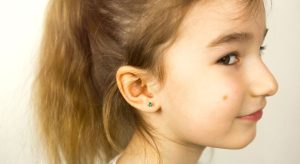
Signs of Trouble: Recognizing an Infection
Understanding the signs of an infected ear piercing is crucial to maintaining healthy piercings. It’s important to pay attention to any unusual symptoms or discomfort
- Redness, swelling, and tenderness around the piercing site are common indicators of infection
- If you notice a discharge that is yellow or greenish, accompanied by a foul odour, it may be a sign of infection as well
- Another possible sign of trouble is the presence of a bump near your piercing. This can indicate an infection or irritation caused by improper aftercare or low-quality jewellery
- Attention to these warning signs is essential, as untreated infections can lead to more serious complications
Understanding the Signs of an Infected Ear Piercing
One common sign is excessive pain or tenderness around the piercing site. Additionally, if you notice any swelling, redness, or warmth in the area, it could be a sign of infection. Other symptoms include discharge with a foul odour, itching or burning sensations, and a bump or pustules near the piercing. If you experience these signs, seeking medical attention immediately is essential to prevent further complications
Another indication of an infected ear piercing is persistent discomfort even after the initial healing period has passed. If your ear feels sore or sensitive long after getting pierced and doesn’t show improvement over time, it might be worth checking out by a healthcare professional.
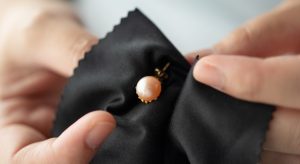
How to Safely Change Your Earrings for the First Time?
Changing your earrings for the first time can be an exciting milestone in your ear piercing journey. However, it’s important to approach it with caution to ensure a safe and comfortable experience. Here are some tips to help you safely change your earrings for the first time.
- Make sure that your ear piercing is fully healed before attempting to change your earrings.
- This usually takes 6-8 weeks for lobe piercings and longer for cartilage piercings.
- Start by washing your hands thoroughly with soap and water to minimize the risk of infection.
- Gently twist and loosen the earring back or front, depending on the type of jewellery you have.
- Then, carefully slide out the old earring while holding onto both ends, being mindful not to force it or cause any pain.
- Next, take a clean pair of earrings you want to wear and sanitize them using rubbing alcohol or an antiseptic solution specifically designed for piercing jewellery.
- Insert one end of the new earring into the hole at a slow and steady pace until it goes through completely.
- Once inserted, secure it by fastening the earring back or closing the mechanism properly but without over-tightening it.
Maintaining Healthy Ear Piercings
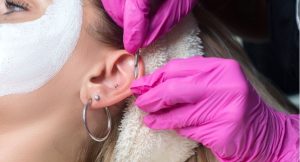
Maintaining healthy ear piercings is essential to ensure they heal properly and avoid complications. Once your piercing has healed, it’s important to continue caring for it. Clean the area regularly using a saline solution or an alcohol-free cleanser. Avoid touching or twisting the earrings too much to prevent irritation.
Additionally, ensure you wear hypoallergenic earrings made from materials like surgical stainless steel or titanium that won’t cause any allergic reactions. Look for signs of infection, such as swelling, redness, or discharge. If you notice anything unusual, consult a professional piercer or healthcare provider immediately for proper guidance and treatment options.
Conclusion
Caring for your ear piercing ensures a smooth and safe healing process. Following the proper aftercare practices can minimize the risk of infection and promote faster healing. Remember these key points:
- Ear piercing aftercare begins as soon as you get your new piercing. Cleanse it twice a day with saline solution or saltwater mixture.
- Healing times vary depending on the type of ear piercings, ranging from 4 to 12 weeks or longer. Be patient and avoid changing earrings too early.
- If you notice any signs of infection, such as redness, swelling, or discharge, immediately clean the area with a saline solution and consult a professional if necessary.
- Changing your earrings for the first time should be done safely and hygienically. Make sure your hands are clean and use sterile earrings specifically made for newly healed piercings.
To maintain healthy ear piercings long-term, keep them clean even after fully healing. Avoid touching them unnecessarily and protect them from irritants. Everyone’s body is unique, so listening to your skin’s needs is essential throughout the healing process. Always consult a professional when in doubt or experiencing persistent problems with your ear piercing. Happy healing!