Is your water starting to smell or taste unusual? If so, it may be time to clean your plastic water tank. Over time, dirt, algae, and bacteria can accumulate in water storage tanks, posing a risk to your health. Ensuring that your tank is clean is vital for safe drinking water and hygiene.
This guide provides you with a simple, step-by-step process on how to clean a plastic water tank effectively. Whether you’re tackling a small tank at home or a large industrial-sized tank, we have you covered.
Why Cleaning Your Plastic Water Tank is Essential?
Regularly cleaning your plastic water tank is crucial to ensure a steady supply of safe, clean water. Here’s why:
- Prevents Health Risks: Contaminants like bacteria, algae, and sediments can enter your water supply, leading to health issues.
- Removes Foul Odours and Bad Taste: Stagnant water can develop an unpleasant taste and odour. Cleaning removes the source of the problem.
- Prevents Algae Growth: Sunlight exposure can cause algae to grow on the walls of the tank. Cleaning removes algae and prevents regrowth.
- Extends Tank Lifespan: Dirt, chemicals, and algae can degrade the material of the tank. Cleaning regularly preserves the tank’s structural integrity.
Signs that it’s time to clean your tank include cloudy water, foul smells, unusual taste, and visible algae on the tank walls.
Tools and Materials Needed for Cleaning a Plastic Water Tank
Before starting the cleaning process, you’ll need to gather the necessary tools and materials. Here’s a list of what you’ll need:
| Tool/Material | Purpose |
| Scrubbing brush | To scrub the tank walls and base |
| Cleaning solution | To disinfect and remove stains/algae |
| Hose or water supply | To rinse the tank |
| Protective gloves | To protect your hands from chemicals |
| Bucket | To carry cleaning water |
| Torch/Flashlight | To inspect hard-to-see areas in the tank |
Step-by-Step Guide on How to Clean a Plastic Water Tank
Step 1: Prepare the Tank for Cleaning

The first step in cleaning a plastic water tank is to prepare the tank and its surroundings. This ensures a smooth cleaning process.
Actions to Take:
- Turn Off the Water Supply
- Locate the main valve controlling the water supply to the tank.
- Turn it off to prevent any more water from entering the tank during the cleaning process.
- If you have a pump connected to the tank, turn off the pump as well.
- Drain the Tank
- Open the drain valve at the bottom of the tank to let all the water out.
- If the tank does not have a drain valve, you may need to use a pump or manually siphon the water out.
- Collect the drained water for reuse (like for gardening) to avoid wastage.
- Remove Internal Objects
- If there are any internal parts, such as floating valves or sensors, remove them before cleaning.
Pro Tips:
- Make sure the area around the tank is clear of debris, as it may get wet and slippery.
- Wear protective gloves and a face mask if you are sensitive to dirt, dust, or cleaning chemicals.
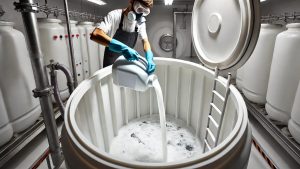
Step 2: Scrub the Inside of the Tank

Once the tank is empty, it’s time to scrub the walls, base, and hard-to-reach corners. This step removes dirt, algae, biofilm, and any stubborn residue.
Actions to Take:
- Get Your Cleaning Tools Ready
- Use a scrubbing brush with hard bristles, preferably one with an extendable handle for deeper reach.
- For small tanks, you may be able to use a sponge or handheld brush.
- Start Scrubbing
- Scrub the tank walls, floor, and corners, focusing on any green, slimy, or discolored areas caused by algae or biofilm.
- Pay extra attention to areas around the tank’s inlet and outlet pipes, as debris tends to accumulate here.
- Scrub the Hard-to-Reach Areas
- Use a torch or flashlight to spot any missed areas.
- Use a smaller brush for crevices and corners that the large brush cannot reach.
Pro Tips
- If algae is particularly stubborn, use a mixture of vinegar and water to loosen it before scrubbing.
- For large tanks, consider using a long-handled scrubbing tool or a motorized scrubber.
- Avoid using abrasive cleaning agents that might damage the inner surface of the plastic tank.
Step 3: Disinfect the Water Tank
After scrubbing, disinfecting the tank is crucial to kill bacteria, germs, and viruses that may still be present. This step also helps prevent the growth of algae.
Actions to Take:
- Prepare a Disinfecting Solution
- Bleach Solution: Mix 1 part household bleach with 10 parts clean water (for example, 1 litre of bleach to 10 litres of water).
- Natural Alternative: Use white vinegar or a mild hydrogen peroxide solution for a more natural cleaning option.
- Apply the Solution to the Tank Walls
- Pour the disinfecting solution into the tank.
- Use a sponge, spray bottle, or cloth to spread the solution evenly across the tank’s walls and base.
- Let the Solution Sit
- Leave the solution in the tank for 1 to 2 hours to ensure proper disinfection.
- During this time, you can clean other parts of the tank like lids, inlets, and outlet pipes.
- Scrub Again (Optional)
- After soaking, give the tank one more scrub, especially in areas that had stubborn stains.
Pro Tips:
- Always wear gloves and protective gear when handling bleach.
- Avoid using strong chemicals that could leave toxic residues in the tank.
- If using vinegar, allow it to sit for an additional 30 minutes for better results.
Step 4: Rinse the Tank Thoroughly
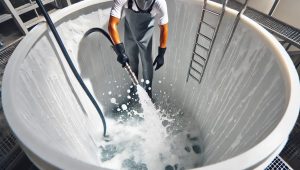
After disinfecting, the tank must be rinsed thoroughly to remove any remaining cleaning agents or chemicals. Leftover residue could contaminate the fresh water supply.
Actions to Take:
- Drain the Disinfectant Solution
- Open the drain valve at the bottom of the tank to release the cleaning solution.
- If the tank doesn’t have a drain, you may need to siphon the liquid manually.
- Rinse with Clean Water
- Use a hose or a bucket to pour clean water into the tank.
- Use this water to rinse all surfaces, including the walls, base, and outlet pipes.
- Swirl the water around the tank to reach all corners.
- Check for Residue
- Run your fingers along the tank walls. If the walls feel slippery, rinse again.
- Check for any strong bleach or vinegar smell. If present, continue rinsing.
Pro Tips:
- Do not rush the rinsing process. Any leftover chemicals can affect the taste and quality of your water.
- To ensure thorough rinsing, consider filling the tank halfway with clean water, scrubbing the sides again, and then draining it.
- Use warm water for a more effective rinse, as it breaks down cleaning agents faster.
Step 5: Final Inspection and Refill
Once the tank is clean and free from chemicals, the final step is to inspect the tank for cleanliness and prepare it for use.
Actions to Take:
- Inspect the Tank
- Use a flashlight to check for any signs of dirt, stains, or algae that may have been missed.
- Pay attention to the tank’s bottom corners and hard-to-see areas.
- Check the Inlet, Outlet, and Valves
- Clean the inlet, outlet, and valves, as these areas often collect debris.
- Ensure the inlet is free from blockages and is not exposed to contaminants.
- Check for Leaks
- Inspect for any signs of cracks, leaks, or damaged seals in the tank.
- Make sure the tank lid fits tightly to prevent the entry of dust, insects, and sunlight (which promotes algae growth).
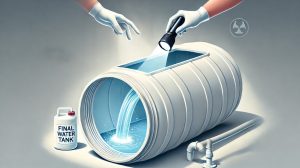
- Refill with Fresh Water
- Open the water supply valve to let fresh water flow into the tank.
- Let the tank fill completely before using the water.
- Before using the water, run it through a tap to ensure it is clear and clean.
Pro Tips:
- Run the first 10-15 litres of water out of a tap before using the water for drinking or cooking.
- If you detect any remaining bleach smell, drain the tank and rinse it once more.
- Inspect the lid to ensure it is tightly closed. If sunlight can penetrate the tank, it increases the chances of algae growth.
Summary of Key Steps
| Step | Action | Key Focus |
| Step 1 | Turn off water, drain tank | Ensure tank is empty |
| Step 2 | Scrub tank walls and base | Remove dirt, algae, stains |
| Step 3 | Disinfect with bleach or vinegar | Kill bacteria, viruses |
| Step 4 | Rinse tank thoroughly | Remove cleaning residue |
| Step 5 | Inspect, refill, check for leaks | Ensure tank is ready for use |
How Often Should You Clean Your Plastic Water Tank?
The recommended cleaning frequency for plastic water tanks is every 6 months. However, this can vary depending on factors like:
- Water source: Rainwater tanks may need more frequent cleaning than municipal supply tanks.
- Tank size and location: Tanks exposed to sunlight are more prone to algae growth and require more frequent cleaning.
- Usage: Higher water usage may introduce more contaminants, requiring more frequent cleaning.
Tips to Keep Your Water Tank Clean for Longer
- Install a tank cover: Prevents dirt, debris, and sunlight from entering the tank.
- Use opaque tanks: Sunlight promotes algae growth, so opt for dark or opaque plastic tanks.
- Regular inspections: Check for leaks, cracks, and signs of contamination every few months.
- Install a sediment filter: Filters at the inlet and outlet can reduce the entry of dirt and algae into the tank.
Common Mistakes to Avoid While Cleaning a Water Tank
- Using harsh chemicals: Avoid strong acids or toxic cleaners as they can damage the tank and leave residues.
- Insufficient rinsing: Always rinse thoroughly to remove all traces of cleaning agents.
- Ignoring pipes and valves: Clean tank inlets, outlets, and lids, as these areas collect dirt and algae.
Best Cleaning Products for Plastic Water Tanks
- Bleach: A simple and affordable disinfectant that kills bacteria and algae.
- Vinegar: An eco-friendly cleaning option to remove light stains and odors.
- Commercial cleaning solutions: Specialized tank cleaners are available but should be used carefully to avoid residue.
DIY vs Professional Cleaning: Which Should You Choose?
DIY Cleaning: Suitable for small to medium tanks that can be cleaned easily with basic tools.
Professional Cleaning: Required for large or industrial tanks that are difficult to access. Professionals use advanced equipment to ensure a thorough clean.
| DIY Cleaning | Professional Cleaning |
| Low cost | Costly but comprehensive |
| Requires time and effort | Done quickly by experts |
| Risk of missing spots | Full coverage guaranteed |
Conclusion
A clean water tank ensures safe, hygienic water for your household. Regular cleaning every 6 months prevents algae growth, bad odors, and potential health risks. Follow the step-by-step guide in this article to clean your plastic water tank like a pro. For large or hard-to-access tanks, consider hiring a professional.
By following these guidelines, you can enjoy safe, fresh-tasting water for you and your family.
Frequently Asked Questions (FAQ)
How often should I clean my plastic water tank?
Clean your tank every 6 months or sooner if you notice cloudy water, bad odors, or algae growth.
What cleaning agent is best for plastic water tanks?
Bleach, white vinegar, and mild commercial cleaners are effective and safe to use.
Can I clean my water tank without draining it?
No, you must fully drain the tank to remove dirt, algae, and other contaminants properly.
How do I prevent algae from growing in my water tank?
Use a tank cover, clean it regularly, and consider an opaque tank to block sunlight.
Can I use bleach to disinfect my water tank?
Yes, bleach is one of the best disinfectants. Use a 1:10 ratio of bleach to water.
Do I need professional help to clean my water tank?
Small tanks can be cleaned yourself. For large or commercial tanks, professional help is recommended.
What are the signs that my water tank needs cleaning?
Cloudy water, foul odors, taste changes, and algae growth are clear signs.