Keeping your bike chain clean is an essential part of bicycle maintenance. A clean and well-lubricated chain not only ensures smooth pedalling but also extends the lifespan of your bike.
So, if you want to enjoy a seamless riding experience and protect your investment, it’s time to learn how to clean bike chain like a pro!
In this article, we will guide you through the step-by-step process of cleaning your bike chain effectively and effortlessly. Get ready to transform that grimy mess into a shining masterpiece! So grab your gear, put on that determined face, and let’s dive right in!
Importance of a Clean Bike Chain
A clean bike chain plays a vital role in the overall performance of your bicycle. First and foremost, it ensures smooth and efficient pedalling. When dirt, grime, and debris build up on the chain, it creates friction that can hinder your ability to accelerate or maintain a steady speed.
By regularly cleaning your bike chain, you eliminate these obstacles and experience enhanced power transfer with each pedal stroke. Not only does a clean chain improve performance, but it also extends the lifespan of your drivetrain components.
Dirt and grit can act as abrasive particles that prematurely wear down the teeth on your gear. By removing this buildup through regular cleaning, you minimise wear and tear on both the chain and cassette.
Moreover, keeping your bike chain clean helps prevent rust from forming. Rust is not just unsightly; it can cause serious damage to your bike’s metallic parts over time. Regularly cleaning off any moisture or contaminants from the chain prevents oxidation and keeps everything running smoothly for years to come!
Tools and Materials Needed for Cleaning
To effectively clean your bike chain, you’ll need a few essential tools and materials. First off, you’ll need a sturdy brush with stiff bristles to scrub away any dirt or grime.
Look for one specifically designed for bike cleaning to ensure it’s suitable for the job. Additionally, having a degreaser on hand is crucial in breaking down stubborn grease and oil buildup.
Next, gather some old rags or towels that you don’t mind getting dirty, as these will be used to wipe down the chain after cleaning. You may also want to have some gloves handy to protect your hands from the messier parts of the process.
Another important tool is a chain cleaner device, which makes cleaning much easier and more efficient. These devices typically feature rotating brushes that help remove debris from all sides of the chain simultaneously.
With these tools and materials at your disposal, you’ll be well-equipped to tackle those grimy bike chains and restore them back to their optimal performance!
How to Clean Bike Chain?
Maintaining a clean bike chain is essential for optimal performance and longevity of your bicycle. A dirty chain can lead to poor shifting, increased wear on other components, and decreased efficiency. So, let’s dive into the step-by-step process of how to clean bike chain.
Preparing the Cleaning Solution
To effectively clean your bike chain, you’ll need to prepare a suitable cleaning solution. This solution will help break down dirt and grime that has accumulated on the chain over time. There are several options for cleaning solutions, but one common choice is a mixture of warm water and dish soap.
First, fill a bucket or container with warm water. Make sure it’s not too hot, as this can damage the chain. Then, add a small amount of dish soap to create a soapy solution. Mix it well until it forms suds.
Another option for preparing the cleaning solution is using a specialised bike degreaser, which is available in most bicycle shops. These degreasers are specifically formulated to cut through tough grease and oil buildup on the chain.
Remember, when preparing your cleaning solution, always follow the manufacturer’s instructions if you’re using a specific product. Now that you have your cleaning solution ready let’s move on to soaking and scrubbing the chain in our next section!
Removing the Chain From the Bike
To begin the process of cleaning your bike chain, you’ll need to remove it from the bike. This step is essential because it allows for easier access and thorough cleaning. Plus, removing the chain also prevents any accidental damage to other parts of the bicycle during the cleaning process.
Shift your bike into its lowest gear to release tension on the chain. Locate the quick link or master link on your chain – this is usually a special connector that can be easily disconnected by hand or with a pair of pliers. Gently separate the links and carefully slide out the chain from both derailleurs.
Once removed, place your bike chain in a container filled with warm, soapy water or a designated degreaser solution. This will help break down grease and dirt buildup on each individual link. Allow it to soak for around 10-15 minutes while periodically agitating or scrubbing it with a brush or sponge.
Remember, taking off the chain may seem like an extra step in maintaining your bike’s cleanliness, but trust me when I say that it’s worth every effort! By doing so, you ensure all areas of your beloved two-wheeler receive proper attention and care during maintenance sessions.
Soaking and Scrubbing the Chain
Soaking and scrubbing the chain is an essential step in cleaning your bike chain. This process helps remove built-up dirt, grease, and grime that can hinder its performance.
To begin, fill a bucket or container with warm water and add a degreaser or bike-specific cleaning solution. Submerge the chain completely and let it soak for a few minutes.
Next, take a brush with stiff bristles or use an old toothbrush to scrub the entire length of the chain. Pay close attention to each link, ensuring that you remove any stubborn residue. Scrubbing vigorously will help dislodge dirt particles stuck between the links.
After thoroughly scrubbing the chain, rinse it off with clean water to remove any remaining debris or cleaner residue. Give it a gentle shake to remove excess water before patting it dry with a clean towel or letting it air dry completely. Remember that moisture can lead to rusting if not dried properly.
Rinsing and Drying the Chain
Once you’ve finished scrubbing the bike chain, it’s time to move on to rinsing and drying. This step is essential for ensuring that no cleaning solution or dirt remains on the chain, which could potentially cause damage or reduce its performance.
To rinse the chain, use a steady stream of water from a hose or faucet. Make sure to thoroughly wash away any remaining soap or degreaser. You can also use a brush with soft bristles to help remove stubborn residue.
After rinsing, it’s crucial to dry the chain properly. Use a clean cloth or towel to gently wipe off any excess moisture. Pay attention to all parts of the chain, including links and rollers. Alternatively, you can hang the chain up and allow it to air dry completely before reinstalling it on your bike.
By taking these steps in rinsing and drying your bike chain, you’ll ensure that it is clean and ready for lubrication in the next stage of maintenance!
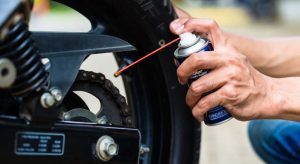
Lubricating the Chain
Now that you’ve thoroughly cleaned your bike chain, it’s time to give it some much-needed lubrication. This step is crucial for ensuring smooth and efficient performance while riding.
To begin, choose a high-quality bicycle chain lubricant that suits your riding conditions. Apply a few drops of the lubricant onto each individual link of the chain, focusing on the inner side where it contacts with other components. Use a rag or brush to spread the lubricant evenly along the entire length of the chain.
Once you’ve applied the lubricant, allow it some time to penetrate into the chain before wiping off any excess oil. This will prevent dirt and debris from sticking to your newly cleaned chain. Remember to repeat this process regularly as part of routine maintenance to prolong the life of both your bike chain and drivetrain components.
| Step | Instruction |
| Prepare Cleaning Solution | Mix warm water and dish soap in a bucket or use a specialized bike degreaser to create a cleaning solution. Follow manufacturer’s instructions for specific products. |
| Removing the Chain From the Bike | Shift bike into lowest gear, locate quick link/master link, disconnect chain carefully, and remove from derailleurs. Place chain in soapy water/degreasersolution to soak for 10-15 minutes. |
| Soaking and Scrubbing the Chain | Submerge chain in warm soapy water/degreaser, scrub with a brush/toothbrush to remove dirt and grease buildup. Rinse thoroughly with clean water, pat dry with a towel or let air dry completely. |
| Rinsing and Drying the Chain | Rinse chain with water to remove any remaining soap/degreaser, dry thoroughly with a towel, paying attention to all parts of the chain. Alternatively, air dry before reinstalling on the bike. |
| Lubricating the Chain | Choose a suitable bicycle chain lubricant, apply drops to each link focusing on the inner side, spread evenly, allow time to penetrate, wipe off excess. Repeat regularly for optimal performance. |
Pro Tips for Maintaining a Clean Bike Chain

- Regular Cleaning: To keep your bike chain in top condition, it’s essential to clean it regularly. Aim for at least once every few weeks if you ride frequently or more often if you encounter muddy or dusty conditions.
- Use the Right Tools: Invest in a good quality chain cleaner tool and a stiff bristle brush specifically designed for cleaning bike chains. These tools will make the task much easier and ensure thorough cleaning.
- Proper Lubrication: After cleaning, don’t forget to lubricate your bike chain with a suitable bicycle-specific lubricant. Apply just enough to coat each link evenly, avoiding excess oil that can attract dirt and debris.
Remember, maintaining a clean bike chain not only prolongs its lifespan but also improves your overall cycling experience by ensuring smooth gear shifts and efficient power transfer. So take care of your bike’s heart – its chain – and enjoy those endless rides!
Conclusion
Regularly cleaning your bike chain is a crucial aspect of bicycle maintenance that should not be overlooked. By taking the time to clean and maintain your chain, you can experience several benefits that will enhance both the performance and longevity of your bike. A clean bike chain ensures smooth pedalling, extends the lifespan of your drivetrain components, and prevents rust from forming.
To properly clean your bike chain, you’ll need a few simple tools and materials such as a brush, degreaser, old rags or towels, and a chain cleaning device.
By following these steps on how to clean bike chain regularly, you can keep your bike’s heart in top condition and enjoy uninterrupted rides for years to come.
Remember to also follow some pro tips such as regular cleaning, using the right tools, and proper lubrication to make the task easier and more effective. So next time you hit the road or trails on your bike, don’t forget to give that trusty chain some well-deserved TLC!
FAQ
How often should I clean my bike chain?
It’s recommended to clean your bike chain every 100-200 miles or sooner if it appears dirty.
Can I use any household cleaner to clean my bike chain?
While warm water and dish soap are commonly used, using a specialized bike degreaser is more effective.
Do I need to remove the chain from the bike to clean it?
Yes, removing the chain allows for thorough cleaning and prevents damage to other bike parts.
How long should I soak the chain in the cleaning solution?
Soak the chain for around 10-15 minutes, agitating or scrubbing periodically for best results.
Why is lubricating the chain important after cleaning?
Lubrication maintains smooth performance, prevents rust, and prolongs the life of the chain and drivetrain.