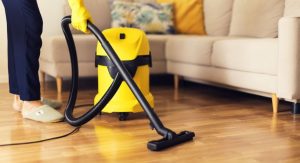
Keeping your Shark vacuum clean is crucial for maintaining its performance and extending its lifespan. Regular cleaning not only ensures that your vacuum operates at optimum efficiency but also helps to keep your home free from dirt, dust, and allergens. In this comprehensive guide, we will walk you through the step-by-step process of how to clean a Shark vacuum.
From emptying the dust cup to disinfecting the exterior, we’ve got you covered! Say goodbye to clogged filters and hello to a cleaner home with these easy-to-follow tips. So grab your cleaning gloves, and let’s get started!
Why is Regular Cleaning Important for Your Shark Vacuum?
Regular cleaning is essential for maintaining the performance and longevity of your Shark vacuum. A clean vacuum ensures that it effectively picks up dirt and debris from your floors. Over time, dust and hair can accumulate in the brush roll and nozzle, reducing suction power. By regularly cleaning these components, you’ll keep your vacuum operating at its best.
Regular maintenance helps to prevent clogs in the filters and dust cups. When these areas become filled with debris, airflow is restricted, making it harder for the vacuum to pick up dirt efficiently. By emptying the dust cup after each use and washing the filters regularly, you’ll prevent clogs and maintain optimal suction power.
Regular cleaning promotes a healthier living environment by removing allergens from your home. Dust mites, pet dander, pollen – they all have a way of finding their way into carpets and upholstery. A clean Shark vacuum will effectively capture these allergens instead of spreading them around as you clean.
Step-by-step Guide on How to Clean a Shark Vacuum
Regular cleaning of your Shark vacuum is essential to maintain its performance and prolong its lifespan. Here’s a step-by-step guide on how to clean your Shark vacuum effectively.
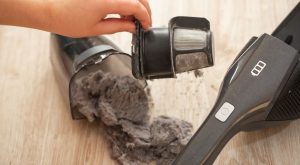
Removing and Emptying the Dust Cup
Removing and emptying the dust cup is an essential step in cleaning your Shark vacuum. Not only does it help maintain optimal suction power, but it also prevents debris from accumulating inside the machine. Follow these simple steps to ensure a thorough cleaning.
First, locate the dust cup on your Shark vacuum. It’s usually located at the front or side of the unit and can be easily removed by pressing a release button or lever. Once removed, take it to a rubbish bin or bag and open the bottom lid to release the collected dirt and debris.
Next, give the dust cup a good rinse with warm water to remove any remaining residue. Be sure to use mild detergent if necessary, but avoid harsh chemicals that could damage the plastic. After rinsing, allow it to air dry completely before reinserting it back into your vacuum.
Don’t forget to clean out any hair or tangled fibres from around the entrance of the dust cup using scissors or tweezers. Keeping this area clear will prevent clogs and ensure proper airflow for efficient cleaning performance.
Washing the Filters
One crucial step in cleaning your Shark vacuum is washing the filters. Over time, dust and debris can clog these filters, reducing their effectiveness. By regularly washing them, you can ensure optimal suction power and maintain peak performance.
To start, locate the filters on your Shark vacuum. They are typically found near the dust cup or behind a panel. Remove the filters carefully, as instructed in your user manual. Rinse them under lukewarm water until all dirt is removed. Avoid using any cleaning agents or scrubbing too vigorously to prevent damage.
After rinsing, gently shake off excess water and allow the filters to air dry completely before reinstalling them back into the vacuum cleaner. This process may take several hours, depending on humidity levels in your home.
Remember that clean filters are essential for maintaining efficient suction and preventing particles from being released back into your home’s air while vacuuming. Regularly washing these filters will help extend their lifespan and keep your Shark vacuum performing at its best!
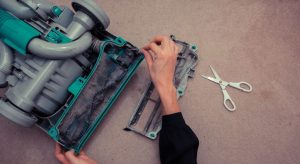
Cleaning the Brush Roll and Nozzle
The brush roll and nozzle of your Shark vacuum are two areas that often accumulate dirt, hair, and debris. Regular cleaning of these parts is crucial to maintain optimal performance. Here’s a step-by-step guide on how to clean them effectively.
Make sure the vacuum is powered off and unplugged before starting the cleaning process. Locate the brush roll at the bottom of the vacuum head. Using scissors or a seam ripper, carefully remove any tangled hair or string from around the brush bristles. This will prevent clogs and ensure efficient suction.
Next, inspect the nozzle for any blockages or obstructions. Clear away any large debris with your hands or use a small tool like tweezers to remove stubborn items stuck in crevices.
Once you’ve cleared away all visible dirt and debris from both the brush roll and nozzle, it’s time to give them a thorough cleaning using warm, soapy water. Gently scrub both parts with a soft-bristled brush until they’re free from dirt buildup. Rinse thoroughly with clean water and allow them to air dry completely before reassembling your Shark vacuum.
Disinfecting the Exterior of the Vacuum

Disinfecting the exterior of your Shark vacuum is an important step in keeping it clean and hygienic. Over time, dust, dirt, and bacteria can accumulate on the surfaces of your vacuum, which can potentially be transferred to other areas of your home. Follow these simple steps to disinfect the exterior of your Shark vacuum effectively.
Start by unplugging the vacuum from the power source and ensuring that it is turned off. Use a damp cloth or sponge with mild soap to gently wipe down all surfaces of the vacuum, including the handle, body, and attachments. Pay special attention to any areas that may have come into contact with dirt or debris during use.
Next, rinse out your cloth or sponge thoroughly and wring out any excess water. Wipe down all areas again with just plain water to remove any soap residue. This will help ensure that no sticky film is left behind on your vacuum’s surface.
Allow all parts of the vacuum to air dry completely before using it again or storing it away. Avoid using harsh chemicals or abrasive materials when cleaning, as they can damage the finish of your Shark vacuum.
Tips for Maintaining Your Shark Vacuum’s Performance
Regular maintenance is key to keeping your Shark vacuum performing at its best. Here are some simple yet effective tips for maintaining the performance of your Shark vacuum.
Make sure to empty the dust cup regularly. A full dust cup can hinder suction power and reduce overall cleaning efficiency. To do this, remove the dust cup from the vacuum and empty it into a rubbish bin. Rinse it with water if necessary and let it dry completely before reattaching it.
Don’t forget about the filters! Over time, dirt and debris can clog up the filters, affecting airflow and suction. Remove the filters according to your specific model’s instructions and wash them gently with warm soapy water. Allow them to air dry completely before reinstalling them.
Keep an eye on the brush roll and nozzle for any tangled hair or debris that may impede performance. Regularly check these areas for blockages or obstructions, removing anything that might be causing issues.
By following these simple maintenance tips, you can ensure that your Shark vacuum continues to provide powerful suction and efficient cleaning results every time you use it!
Common Troubleshooting Issues With Shark Vacuums
- Loss of Suction: One common issue that Shark vacuum owners may encounter is a loss of suction power. If you notice that your vacuum isn’t picking up dirt and debris as effectively as it used to, there are a few possible causes. First, check the dust cup and filters for any clogs or blockages. Clean them if necessary and make sure they are properly installed before using the vacuum again. Additionally, inspect the brush roll for tangled hair or other obstructions that could be impeding its performance.
- Brush Roll Not Spinning: Another problem you might come across is when the brush roll stops spinning during use. This can occur due to tangled hair or fibres wrapped around the brush roll, preventing it from rotating properly. To fix this issue, turn off the vacuum and unplug it from the power source. Carefully remove any tangled debris from around the brush roll using scissors or your fingers (if safe). Once clean, plug in the vacuum and test whether the brush roll spins freely.
- Overheating: If your Shark vacuum starts overheating during use, it’s important to address this issue promptly to avoid damage to your machine. The most common cause of overheating is a clogged filter or blocked airflow passages within the vacuum cleaner itself. Start by checking all filters for dirt buildup and clean them thoroughly according to manufacturer instructions if needed.
Conclusion
Regular cleaning is essential to maintain the performance and longevity of your Shark vacuum. By following our step-by-step instructions on this how to clean a shark vacuum guide and implementing our maintenance tips, you can keep your vacuum in top condition and ensure efficient cleaning results every time.
Remember to regularly empty the dust cup, wash the filters, and clean the brush roll and nozzle to prevent clogs and maintain optimal suction power.
Disinfecting the exterior of your vacuum is also important for a hygienic home. And if you encounter any troubleshooting issues, refer to our guide for possible solutions. With these tips, your Shark vacuum will continue to provide powerful cleaning performance for years to come. Happy cleaning!